Thursday, 11 October 2012

Pumpkin Cheesecake!

Tonight I made my first cheesecake! It is fall, my favorite season, so I had to make pumpkin cheesecake. (See my previous blog for directions on how to make your own pumpkin puree!)

I used this recipe: Double Layer Pumpkin Cheesecake from allrecipes.com. I switched some of the sugar for stevia because I am trying to shed a couple of these jolly pounds I have gained. I will be making this again but I will DOUBLE the filling. Not enough cheesecake in my crust!

 I made my crust using this recipe: Graham Cracker Crust I also used some stevia in the crust.

Thanks to the people who shared these recipes on allrecipes.com!

Now go make this cheesecake and enjoy! And if you can't wait the three hours it needs to chill in fridge, pop it in the freezer! :)

Sunday, 7 October 2012

Make your own Pumpkin Puree!

I always wanted to make my own pumpkin puree for a few reasons: 1. Fall is pumpkin season, they are easy to find. 2. Support your local farmers and buy their pumpkins! 3. I always feel like I am cheating when I use store bought when I am perfectly capable of making it myself.

This fall I took advantage of my inability to buy pumpkin puree in a can (these silly Swedish people have yet to discover the deliciousness of these orange beauties). So I went to the downtown market, and luckily some of the farmers had pumpkins!

Here are the directions to make your own pumpkin puree. It is so easy!

1. Cut pumpkin in half. Remove the pulp and seeds. (keep seeds in you want to eat them later)


2. Cover pumpkin halves with foil and place on a cookie sheet.
3. Bake in oven at 350 degrees Fahrenheit for 1-2 hours. This depends on the pumpkin's size. Remove from oven when pumpkin is tender/ the skin peels away pretty easily.


4. Let cool.
5. Peel away pumpkin from skin.


6. Put the pumpkin in blender or food processor and blend until there are no chunks.


7. Freeze or use, whatever you want :) I saved mine in the freezer in 850 gram boxes (the equivalent of two 15 oz cans)
8. Make something delicious like pumpkin bread or pumpkin cheesecake and ENJOY!


Saturday, 29 September 2012

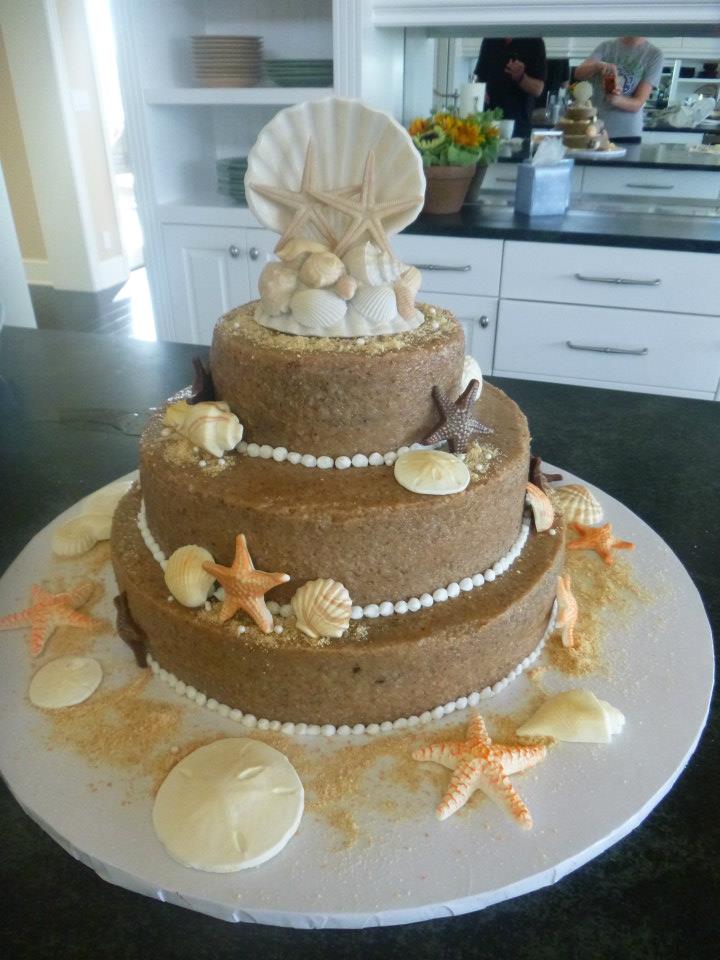
German Chocolate Wedding Cake

German Chocolate Wedding Cake with edible sand and seashells

Well, another life goal accomplished. I made my first wedding cake! My dad and his lovely wife got married last week in southern California on the beach and had a beach themed wedding. I was given the honor of making the cake (and cupcakes)!


My dad's favorite cake is german chocolate and his mom (whom is no longer with us) used to make it for him. Also, the traditional coconut pecan frosting that goes on german chocolate cake kinda looks like sand. In honor of my grandma we decided to go with german chocolate cake. For the cupcakes we went with a chocolate cupcake with chocolate frosting and a carrot cake cupcake with cream cheese frosting.


My new stepmom ordered lots of chocolate seashells. There were milk chocolate, white chocolate, and swirl. I felt like they needed some color so I painted them with luster dust. If you have not tried luster dust, let me tell you, I am extremely sad that I did not discover this wonderful product until just now! It gave the shells depth, shine, and color. I loved it!


After 4 days of baking, mixing, dishwashing, piping, luster dusting, and finding cake batter in strange places, this was what came of all the madness...


And we all ate cake and drank champagne and were married! Congratulations to my dad and his wife! It was a wonderful trip to CA, I loved seeing my family :)


Sunday, 2 September 2012

Spanish Bulgur Chicken Stuffed Peppers


I have been craving my mom's stuffed peppers for weeks. Finally I decided I would make some myself. But I did not want the typical ground meat and rice variety so I chose to use chicken and bulgur instead.  Then I thought I would try Spanish/Mexican flavors. 


So I basically made Spanish Bulgur (instead of spanish rice). Then I cooked some chicken in taco seasoning. Added in some of my favorite mexican add ins and stuffed some peppers!


They turned out beautiful and delicious. Also, very low in calories. Approximately 200 per pepper half.


I love things that have lots of veggies and cheese and grains. The stuffing for this is actually something I would eat even outside of the pepper. In fact, there was some 'stuffing' left over that I plan to have for lunch tomorrow.

Here is the recipe: (I cut some of the ingredients in half because I had so much left over)

Spanish Bulgur Chicken Stuffed Peppers:

Ingredients:

3 large bell peppers (which ever color you prefer)
1 white onion chopped
2 garlic cloves crushed
1/2 cup bulgur
1 chicken bouillon cube
1.5 cup water
1 can crushed tomatoes
Half red bell pepper cubed
1/2 can black beans
1/2 can corn
1 avocado cubed
1 large chicken breast cubed, small pieces
Taco seasoning
1/2 cup feta cheese crumbled
Red chili flake
Black pepper
Salt
3/4 cup Shredded cheese of your choice (jack or cheddar would be great)
Optional: Salsa and sour cream

Directions:

1. Set oven to 400 degrees F. Coat baking pan with cooking spray or vegetable oil. Cut the 3 large bell peppers in half, remove seeds and place in pan. Set aside.

2. In a large frying pan add a tablespoon of oil and cook the onion until translucent, (about 5 minutes) Add the garlic and bulgur and stir while cooking for about 5 minutes. Then add water, bullion cube, red bell pepper and crushed tomato. Stir well and leave to simmer about 15 minutes or until bulgur is cooked and most of the liquid is absorbed. (Note: if the liquid is absorbed before the bulgur is cooked, add some water and continue to simmer)

3. Transfer bulgur to bowl. Fry the chicken with taco seasoning until cooked all the way. Add chicken to bowl of bulgur.

 4. Add avocado, beans, corn, and feta. Season with salt, pepper, and chili flakes to taste. Mix everything and add to the halved bell peppers.

5. Cover with foil and bake 30 minutes or until bell peppers are cooked (soft). Then remove foil, sprinkle on shredded cheese and return to the over for five minutes. Serve.

Optional: Serve with salsa and sour cream. ( I would have but I did not have any on hand)


Enjoy!

Tuesday, 28 August 2012

Homemade Fro-Yo, NO ice cream maker!


I have been experimenting with healthy/low calorie dessert. This may have to do with a. I have a sweet tooth the size of Russia and b. My metabolism has abandoned me. Also, I like health and nutrition. 


So I made some low calorie vanilla ice cream two days ago and today I made some Raspberry Blueberry Cheese Cake Frozen Yogurt. That's right. And a generous portion was only 237 calories. Take that Dreyers 1/2 fat ice cream (which is delicious, but much higher in calories). I think I will leave the berries out tomorrow (yes I will be making more fro-yo tomorrow) and add some cinnamon and walnuts and of course the mashed cookies like the ones in the batch I made tonight. That was my favorite part!


I have included the recipe for this below but know that it is a work in progress/experiment but if you want my notes, to make your own experiment, keep reading. Actually keep reading either way....


I am also making mental notes of other flavors of ice cream and fro-yo I can make. Any ideas????
Leave a comment!


Raspberry Blueberry Cheese Cake Fro-Yo!:


NOTE: I am in Sweden so some of the ingredients do not exist or are different in America.


Ingredients:
350 Grams Turkish Yogurt (I used 3.5% fat)
50 Grams Kesella vanilla (this is like vanilla creme fraiche)
.5 packet of artificial sweetener (like Stevia)
1 tsp vanilla extract
60 Grams frozen berries
about 25 Grams mashed cookies (Digestives or graham crackers are great)
.5 tsp cinnamon
Dash of artificial sweetener

Directions:
Mix the yogurt, Kesella, sweetener, and vanilla until well blended with a whisk or electric mixer. Add frozen berries and stir in with spoon. (Or leave them off until the end and sprinkle on top when served) Put this in freezer. Whisk every 30 minutes until frozen and well blended. While the fro-yo is chilling, mash or grind the cookies and then mix in the cinnamon and sweetener. When frozen yogurt is ready to be served, pour the cookie crumbs in, give it a good mix and serve.

ENJOY! No really, it's only 237 calories... ENJOY!

Saturday, 25 August 2012

Sweden Vs Switzerland (the difference)

When I tell an American something about Sweden, almost 100% of the time the person will ask me a question about Switzerland... A country I have never been to. For some reason, Americans have no idea there is a difference between the two countries and the fact is... they are two different countries! The American education system has failed us. Here is one geography lesson:


Sweden:


                          Where? Sweden is in Northern Europe between Norway and Flinland.     Sweden is Scandinavian.

     
  Cities:
      -Stockholm
      -Gothenburg (Göteborg)
      -Lund
      

Famous for: 
H&M
ABBA
 Pippi Longstocking
 Ikea
 Nobel Prize
 Volvo 
Sony Ericsson
Vikings

Scientist: 
Carl Linnaeus 


Language:
 Swedish

Cuisine:
 Swedish meatballs
Lax (salmon)
 Lingonberry sauce
Elk
 Swedish Pancakes 
Pickled Herring 
Lutfisk 


Switzerland:

                                  Where? Switzerland is right above Italy. It is pretty centrally located in Europe. It is surrounded by Germany, Austria, and France. 

     Cities:
      -Basel
      -Zurich
      -Geneva
      -Lucerne

Famous for: 
Lindt
Nestle
 Toblerone 
Swiss Army Knife
 Founded Red Cross

Scientist: 
Albert Einstien

Language(s): 
German
French
 Italian
 Romansh

Cuisine:
 Fondue
 Emmental
 Muesli
 Gruyère
A lot of Italian, French, and German influence.


Tuesday, 21 August 2012

Chocolate Peanut Butter Truffles

Dreamy Chocolate Peanut Butter Truffles

Chocolate and peanut butter. These are two things I crave just about every minute I am awake. In a successful attempt to indulge my cravings, I decided to see if I could create a peanut butter coated chocolate truffle. 


The end result was as delicious as I had hoped, maybe a little dreamier. I took them to work and they were a hit. 


CHOCOLATE PEANUT BUTTER TRUFFLE RECIPE (makes about 4 dozen):

TRUFFLE: (Taken from Taste of Home)

I took the chocolate truffle recipe from the Taste of Home website: 

http://www.tasteofhome.com/Recipes/Chocolate-Truffles 

3 Cups              Semisweet chocolate chips
1 (14oz) Can    Sweetened condensed milk
1 Tbsp              Vanilla extract

Directions:
-In microwave-safe bowl, melt chocolate chips and sweetened condensed milk; stir until smooth. Add vanilla and stir. Chill the mixture for 2 hours or until it is easy to handle.
-Roll into 1-in balls (or bigger if you would like) and refrigerate. 

PEANUT BUTTER COATING:
1/2 Cup       Peanut Butter Chips
1.5 Tbsp      Smooth peanut butter of choice (I am a Jiff fan)

Directions:
Add the Peanut Butter Chips and peanut butter into a microwave safe bowl. Melt together in microwave, checking and stirring every 30 seconds until you can blend them together into a smooth creamy mixture. 

Take chilled truffles out of the fridge. Place one on a fork and dip into the peanut butter mix and roll around so that it is completely covered. Roll back onto the fork and lightly tap the truffle until the excess peanut butter has fallen off and truffle and place on wax paper. 

Repeat. (If you like the extra kick of salt, sprinkle salt on top of finished truffle while peanut butter mix is still wet or add some salt to the peanut butter mix before dropping in the truffle)
Keep in air tight container in refrigerator. 

Enjoy!